
You would think that you should just be able to plug your $500+ set of electronic drums into your game console and drum away, but unfortunately, its not that easy. But, it is possible to play Rock Band with a real MIDI drum kit.
Thanks to the ingenious ideas of some members of the rockband.com forums, this mod can be achieved with commercially available parts and a little electronics know-how. Here is my step-by-step guide for the methods I used to get my Yamaha DTXplorer working with Rock Band.
ALL THE CREDIT FOR THIS MOD GOES TO THE MEMBERS OF THE ROCKBAND.COM FORUM THAT CONTRIBUTED TO THIS THREAD, including (but certainly not limited to):
- Aelius27, who started the thread and came up with the first working solution, building an impressive MIDI interface from scratch, and who has now come up with a solution involving a PC interface with custom software.
- Blanko, who has been extremely active and helpful on the thread and was the first to complete the mod using the MSA. He also posted an awesome YouTube video showing off his mod and giving an overview of how its done.
- zolon, who discovered the MSA as a possible solution for connecting the Rock Band drum kit to the game console and has also completed this mod with a Yamaha DTXpress.
First, a DISCLAIMER: I am providing this as a guide to the mod that I personally performed on my Rock Band drum controller to allow me to play the game with my Yamaha DTXplorer electronic drum kit. Whether you chose to attempt this mod is your own choice. I cannot guarantee that this will work for the drum kit you are using. However, I CAN GUARANTEE a couple of things: (1) YOU WILL VOID YOUR WARRANTY FROM HARMONIX OR ANY OTHER WARRANTY THAT COVERS YOUR ROCK BAND CONTROLLER. Further, if you break your controller and try to convince Harmonix to give you a new one under their RMA program, you are committing fraud. For more warranty information, see the Rock Band Warranty Site. (2) If you are not sufficiently skilled in fine electronics work, such as soldering and general wiring, etc., YOU ARE GOING TO BREAK YOUR ROCK BAND CONTROLLER (AND MAYBE EVEN YOUR ELECTRONIC DRUM KIT) BEYOND REPAIR. I am not responsible in any way for problems that may arise if you try doing the mod I describe here. It is you responsibility to fully educate yourself and consult any warranty information before you attempt to do anything I describe here. This guide and the activities described herein are meant for informational and entertainment use ONLY.
Introduction
When I initially set out to play Rock Band with my Yamaha DTXplorer, I first wanted to know why I couldn’t just use a MIDI-USB converter and plug it into my XBox 360. The simple answer is that Microsoft keeps the XBox 360 controller standard close to the vest, revealing it only to licensed manufacturers.So the solution that the members of the rockband.com forum came up with was a way to translate the messages that an electronic drum kit sends out via MIDI into simple relay signals that trigger the XBox 360 controller.
Since the source of most the material in this guide is the thread on the rockband.com forums entitled “Rock Band with Electronic Drums (HOWTO),” I will refer at various points to posts in that thread with links in this format: See HOWTO Thread, Post #123.
Equipment
You’ll need the following equipment to complete this mod:
- A Rock Band drum controller. I really feel the need to re-state my above warnings and disclaimer again: Taking any of the steps toward completing this mod will definitely void your warranty from Harmonix. In writing this guide, I am not trying to induce anyone to do this mod. The decision to void your warranty is your own. Altering your drum controller then attempting to get a free replacement under the RMA program is fraud. Don’t do it. See the Rock Band Warranty Site. NOTE: This mod will not work with a regular XBox 360 controller. This is because the Rock Band drum controller has a special chip in it that identifies itself as the drum kit. Unless and until someone figures out how to “trick” the game into thinking a regular controller is drum controller, we are stuck modding the original. See HOWTO Thread, Post #249.
- A MIDI Drum Kit. I am using my Yamaha DTXplorer. Other modders have been successful with a Yamaha DTXpress as well as various Roland kits using this same method. This guide will focus exclusively on the DTXplorer.
- An MSA-P MIDI Decoder (with appropriate firmware). Available here from Highly Liquid. This is the device that takes MIDI signals from the drum kit and toggles PhotoMOS relay switches in response to certain MIDI notes. The MSA-P must be assembled, but Highly Liquid will do that for you for a fee. I also recommend purchasing and having them install the MSA Terminal Block Set. You will also need a power supply. See MSA-P at Highly Liquid for more details. UPDATE: Highly Liquid has updated the firmware of the MSA-P and the current “production” firmware supports the Rock Band mod. So special instructions are no longer necessary when ordering. See HOWTO Thread, Post #361.
- A MIDI Interface for Programming the MSA-P. As explained further below, the MSA-P is programmed via SysEx message, which requires a MIDI interface with your computer. I used the M-Audio Uno from Radio Shack.
- Additional Parts & Supplies:
- A standard MIDI cable.
- Small-gauge wiring (I harvested a Cat5 cable, as have several other modders).
- A soldering iron suitable for fine electronics work and high-quality solder with flux. I used a 15-watt model from RadioShack.
- A project enclosure (optional). I used a 6x4x2″ box from RadioShack.
- Screwdriver, drill, screws, etc. as needed.
Project Overview
At this point, for reference, I put together this diagram to explain the various connections that need to be made to get this mod working:
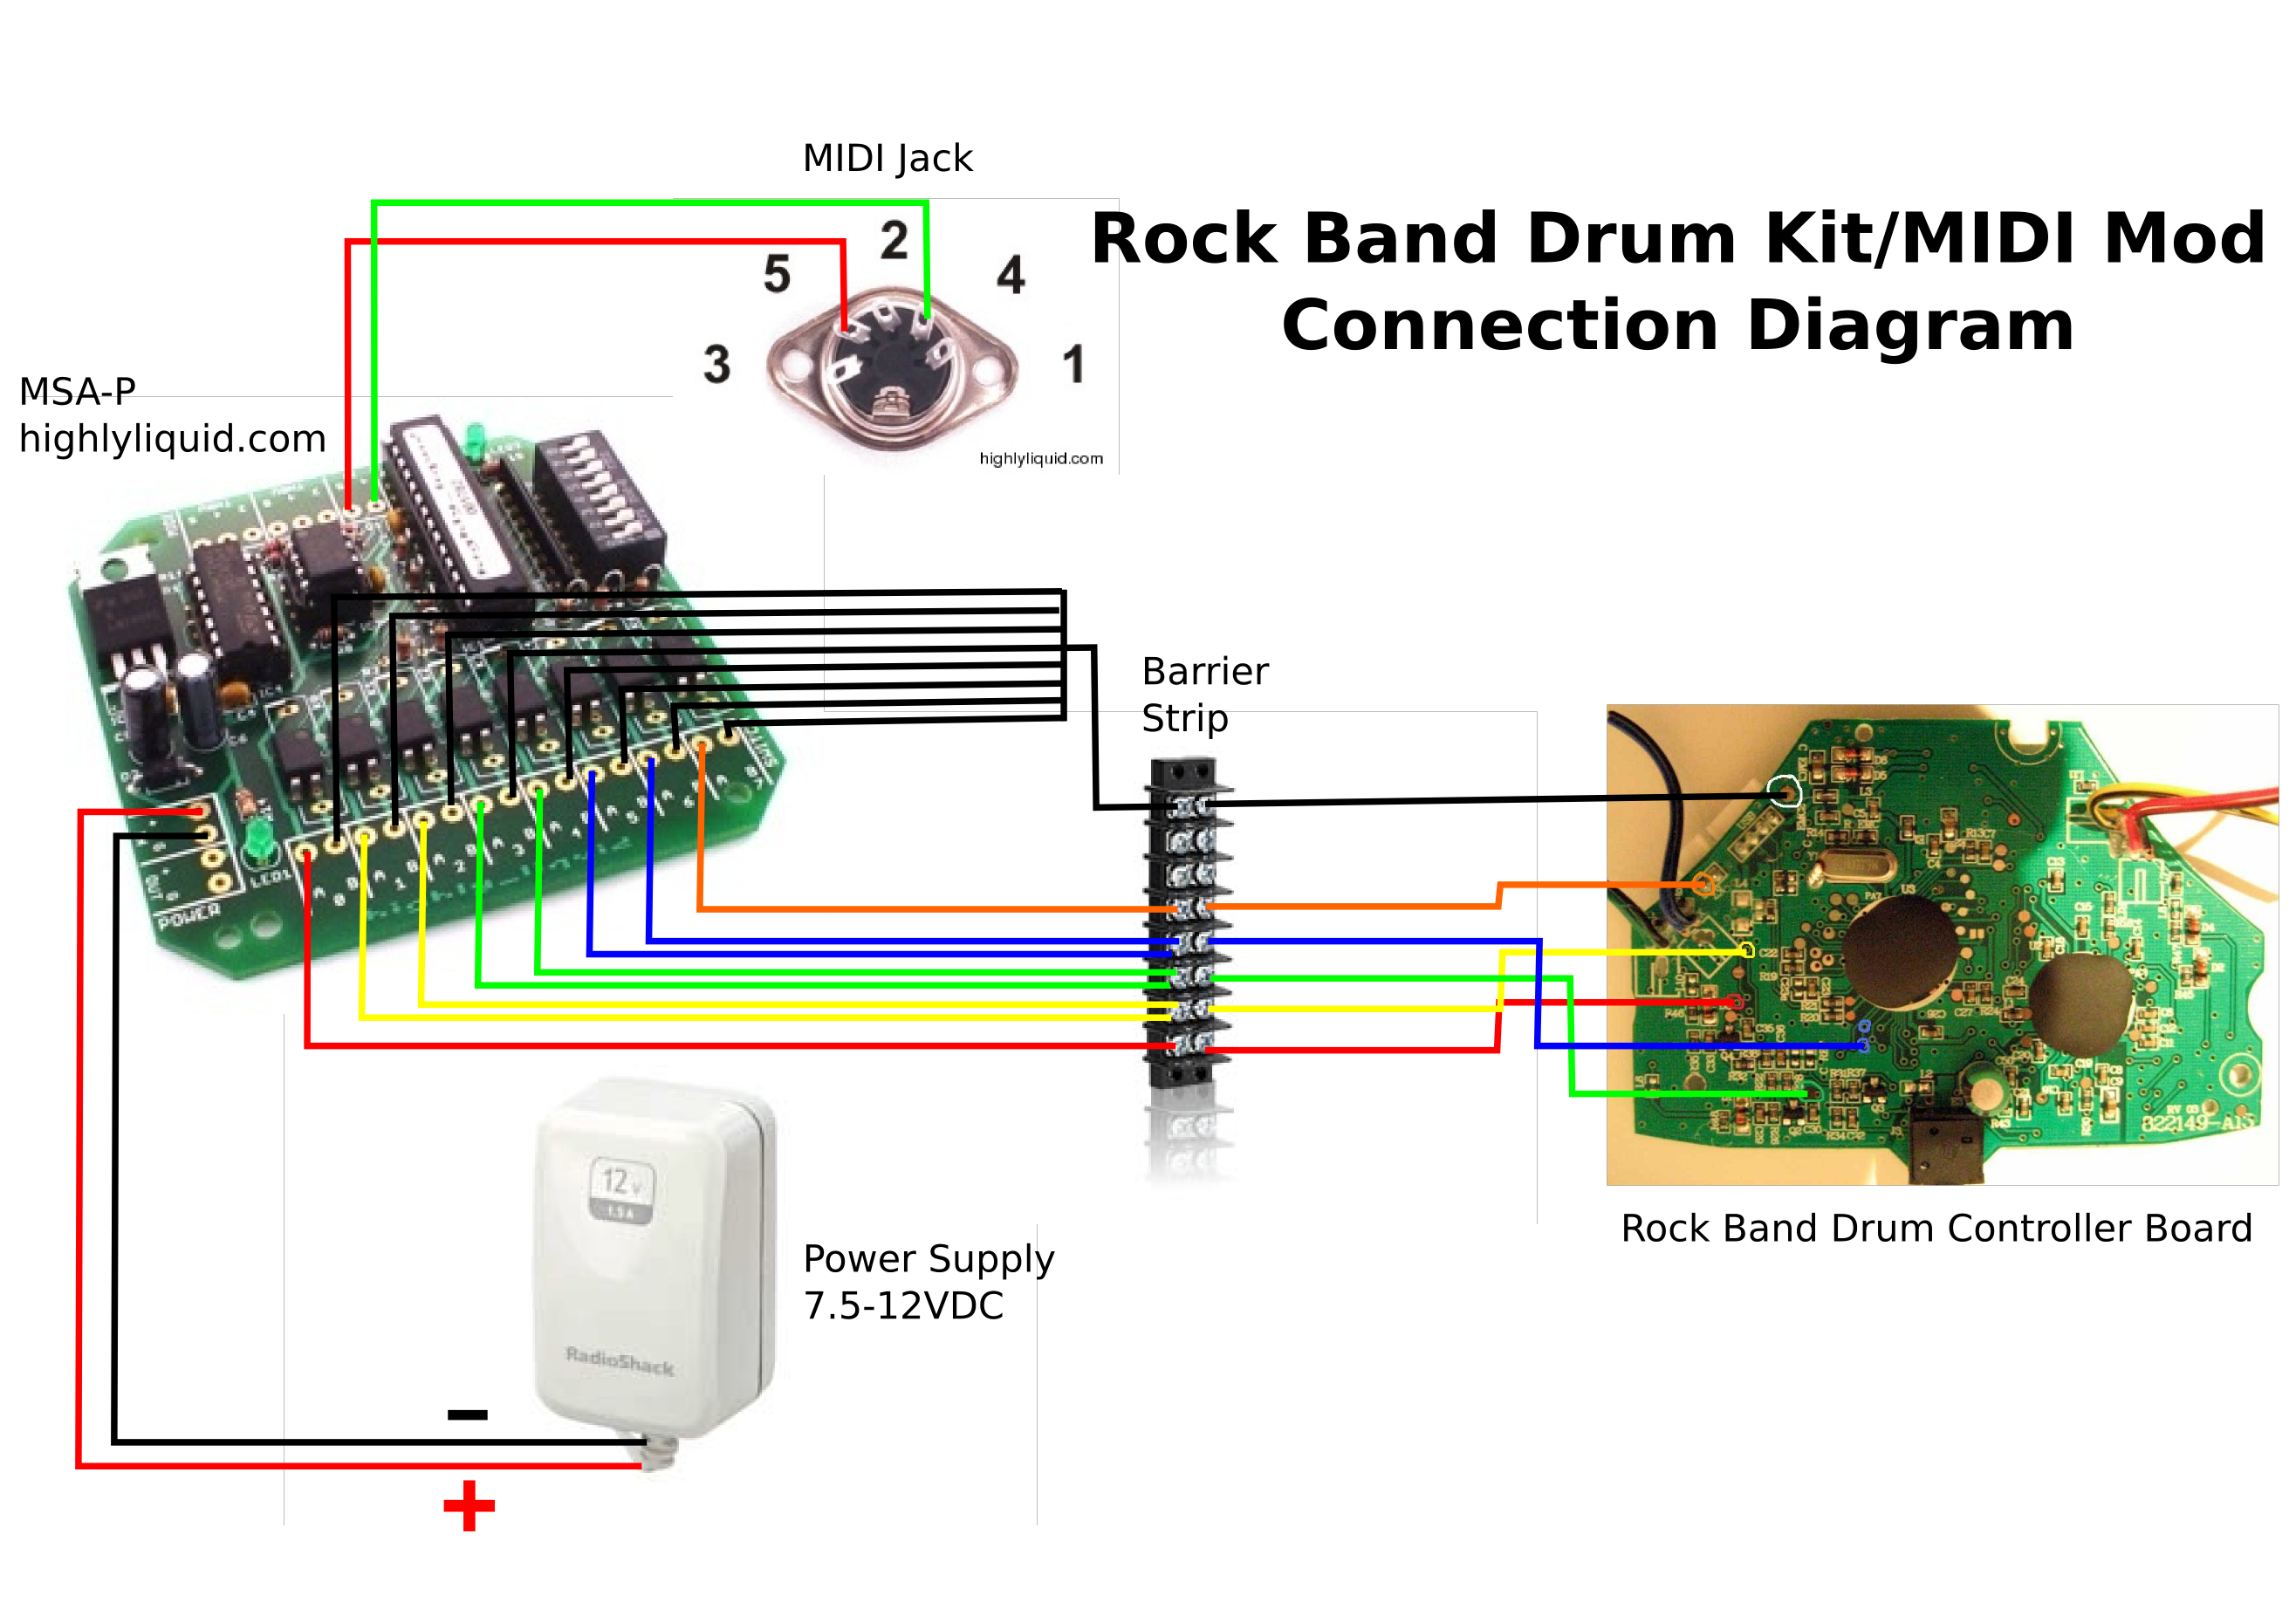
(click for full size)
The electronic drum kit connects to the MSA-P via a MIDI cable. The MSA-P listens to MIDI notes coming from the various triggers on the drum kit and flips one of eight relay switches (numbered 0-7). Soldered connections from the Rock Band drum controller are wired into each of these eight switches. I used a simple barrier strip to split some of the connections. Others have been successful using a breadboard.
As will be explained, I wired the Yellow, Green, and Blue connections into two switches each, to facilitate using multiple triggers to set off those buttons/commands (i.e. Hi-Hat and Hi Tom for Yellow, etc.).
Stage One: Preparing the Rock Band Drum Kit
This first stage requires only the Rock Band drum controller, soldering tools, and wiring, so I recommend completing it while waiting for your MSA-P to be delivered 🙂
What you need to do at this stage is solder wires at very specific points on the controller’s circuit board so that you can essentially create your own external “switch” to activate the buttons on the controller. So, you’ll solder on a ground wire and, for each button, a lead wire.To get to the controller board, you’ll need to remove the trapezoidal plate behind the central controller section (just three small Philips-head screws).
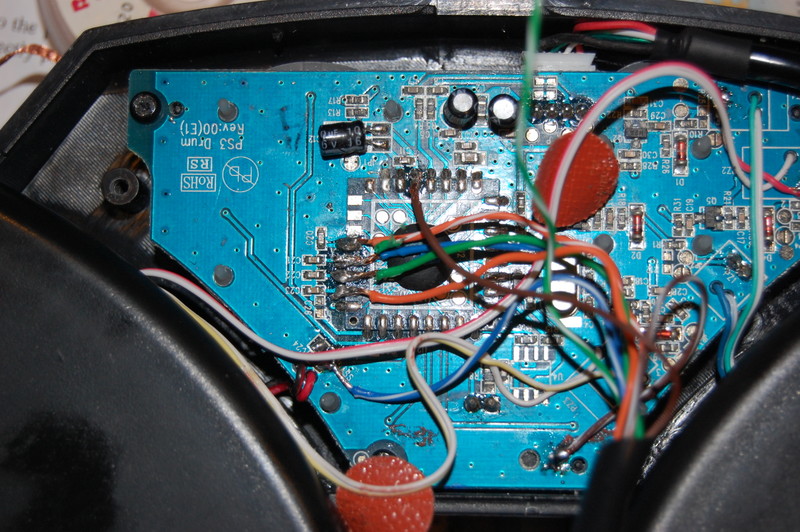
The board looks like this (picture by rockband.com forum member Blanko):
![]()
Note however, that there are at least two different types of control boards used in the various versions of the Rock Band drum controller. The one shown above is the “green board,” but there is another type which I will call the “blue board.” ON A BLUE BOARD, THE SOLDER POINTS WILL BE COMPLETELY DIFFERENT.
I have no personal experience with the blue board, but rockband.com forum member Aelius27 successfully modded his. His photo shows the correct solder points on the blue board, See HOWTO Thread, Post #38:

UPDATE: [For all you PS3 users] I also have no experience with the PS3 RB drum kit controller board, but rockband.com forum member gclabbe does and he’s put together an awesome post with a good detailed walkthrough of how to solder up the PS3 board. Here’s one of gclabbe’s photos of the PS3 board:
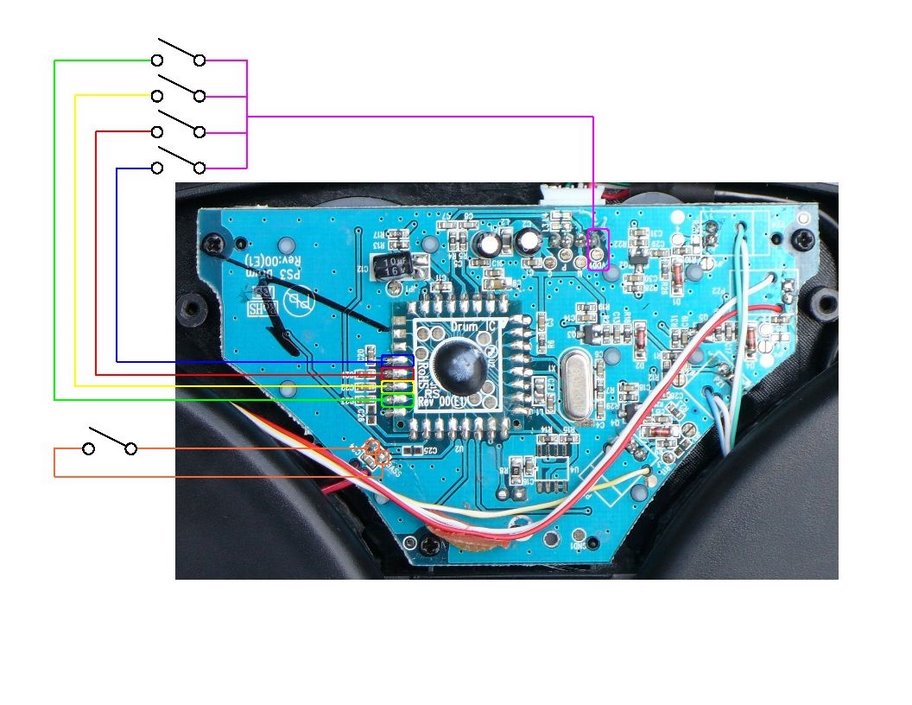
UPDATE: Another one for you PS3 users, rockband.com forum member rmurwin posted this super-clear wiring guide that should make it very easy to find the proper soldering points (click to enlarge):
The solder points for the green Xbox 360 board are circled (in the first photo). Red, Yellow, Blue, and Green are self-explanatory. Orange indicates the solder point for the bass/kick pedal and White is the ground.I did not completely remove my board from my kit, so I cannot speak as to how that is done (i.e. disconnecting other wires coming from the drum heads).
As I said above, I harvested wiring from a Cat5 cable. This worked well because the soldering points are pretty small and it was nice to have all the wires bundled together (for later steps).
So, the next step is to solder your wires to the solder points. I am certainly no expert in soldering techniques so if you don’t know how to do this, do a TON of research like I did before you commit to soldering. You can (and if you don’t know what you’re doing, probably WILL) fry some of the other components on this board, making the controller completely inoperable.
This is what my board looked like, post-soldering:

Here is another modder’s board as well (picture by rockband.com member zolon):

Next you’ll need to close the controller back up. I cut a small notch out of the back plate so I could run my Cat5 cable out:

I checked that everything worked by connecting my controller to my Mac, and firing up the XBox 360 Controller SysPref Pane. With this tool, I was able to confirm that all my buttons still worked and that I could signal Red/B, Yellow/Y, Blue/X, Red/A, and Bass/Kick/LeftTrigger by shorting each wire (i.e. stripping the other end of the wires and touching each one to the ground wire.
Ok, that’s Stage One.
Stage Two: Preparing the MSA-P
The MSA-P basically listens for MIDI notes coming in through its MIDI port and then toggles any of its 8 switches in response to certain notes.
So, for example, if your snare drum sends MIDI note 1, and you wire your Red/A to output 0 on the MSA-P, you need to program the MSA-P to toggle output 0 whenever it hears MIDI note 1 played. The way you program the MSA-P is with a SysEx message. For an explanation of MIDI messaging, see MIDI Machine Control.
First, you need to have the MSA-P assembled. Hopefully, as I suggested, you ordered it pre-assembled from Highly Liquid. Regardless, you’ll have to wire up the included MIDI Jack Panel and your power supply. See the Highly Liquid site for details.
At this point, in order to send the SysEx message to the MSA-P, you’ll need to connect the MSA-P to your computer via a MIDI interface. As I said above, I used a USB-MIDI adapter from RadioShack.
UPDATE: I forgot to mention that you need to set up the MSA-P to receive MIDI input on the correct channel. The DTXplorer is set to MIDI channel 10 (and this cannot be changed). See the DTXplorer User’s Manual, p. 31. On the MSA-P, flip DIP switches 1 and 4 to “on” (and 2 and 3 to “off”) to set it to channel 10. See the Highly Liquid Firmware User Manual, p. 6.
Follow Highly Liquid’s instructions for composing and sending the SysEx message in the Firmware User Manual. In order to figure out the message you should use, you need to look up the MIDI note numbers in your drum kit’s owners manual. You may also be able to change each trigger’s MIDI note number, but that is not possible with the Yamaha DTXplorer. One of the big benefits of using a real kit is that you can map multiple pads to the Rock Band drum controls (for example, you can make both your Lo Tom and Ride Cymbal trigger the Blue button). In order to do this with the DTXplorer, you have to use all 8 PhotoMOS relays on the MSA-P and wire the Yellow, Blue, and Green buttons in parallel. See below for details.
For my setup, I used the following SysEx message:
F0 00 01 5D 02 01 03 1F 03 2E 03 30 03 33 03 2F 03 31 03 2B 03 21 00 4F F7
In English, this message says: “when you hear the SNARE, toggle the RED switch; when you hear the HI-HAT, toggle the YELLOW switch; when you hear the HI TOM (TOM1), toggle the YELLOW switch; when you hear the RIDE CYMBAL, toggle the BLUE switch; when you hear the LO TOM (TOM2), toggle the BLUE switch; when you hear the CRASH CYMBAL, toggle the GREEN switch; when you hear the FLOOR TOM (TOM3), toggle the GREEN switch; when you hear the BASS/KICK PEDAL, toggle the BASS/KICK switch; and do each toggle for 40ms.”
I know I’m not providing a ton of guidance on this stage, but there are just too many combinations of computer (i.e. Windows/Mac), MIDI interface, and SysEx software to cover here. It would be too difficult for me to try to explain how all this works, and there are better sources for explaining how to come up with the right SysEx message. See HOWTO Thread, Post # .
Once you have successfully sent the correct SysEx message to the MSA-P, you’ve finished Stage Two.
Stage Three: Connecting the Modded Rock Band Drum Kit to the MSA-P
As this point, you have wires coming out of your drum controller and your MSA-P is all set to go. Now you need to connect the wires you soldered onto the controller to the corresponding switches on the MSA-P.
On the MSA-P you’ll connect two wires for each XBox button/command; the lead wire and a ground wire. So, you’ll have to do some splitting because you at least need a total of 5 ground wires. In my implementation, I also connected the Yellow, Blue, and Green buttons to two switches each, in parallel. I did this so I could map multiple pads to each of those buttons.
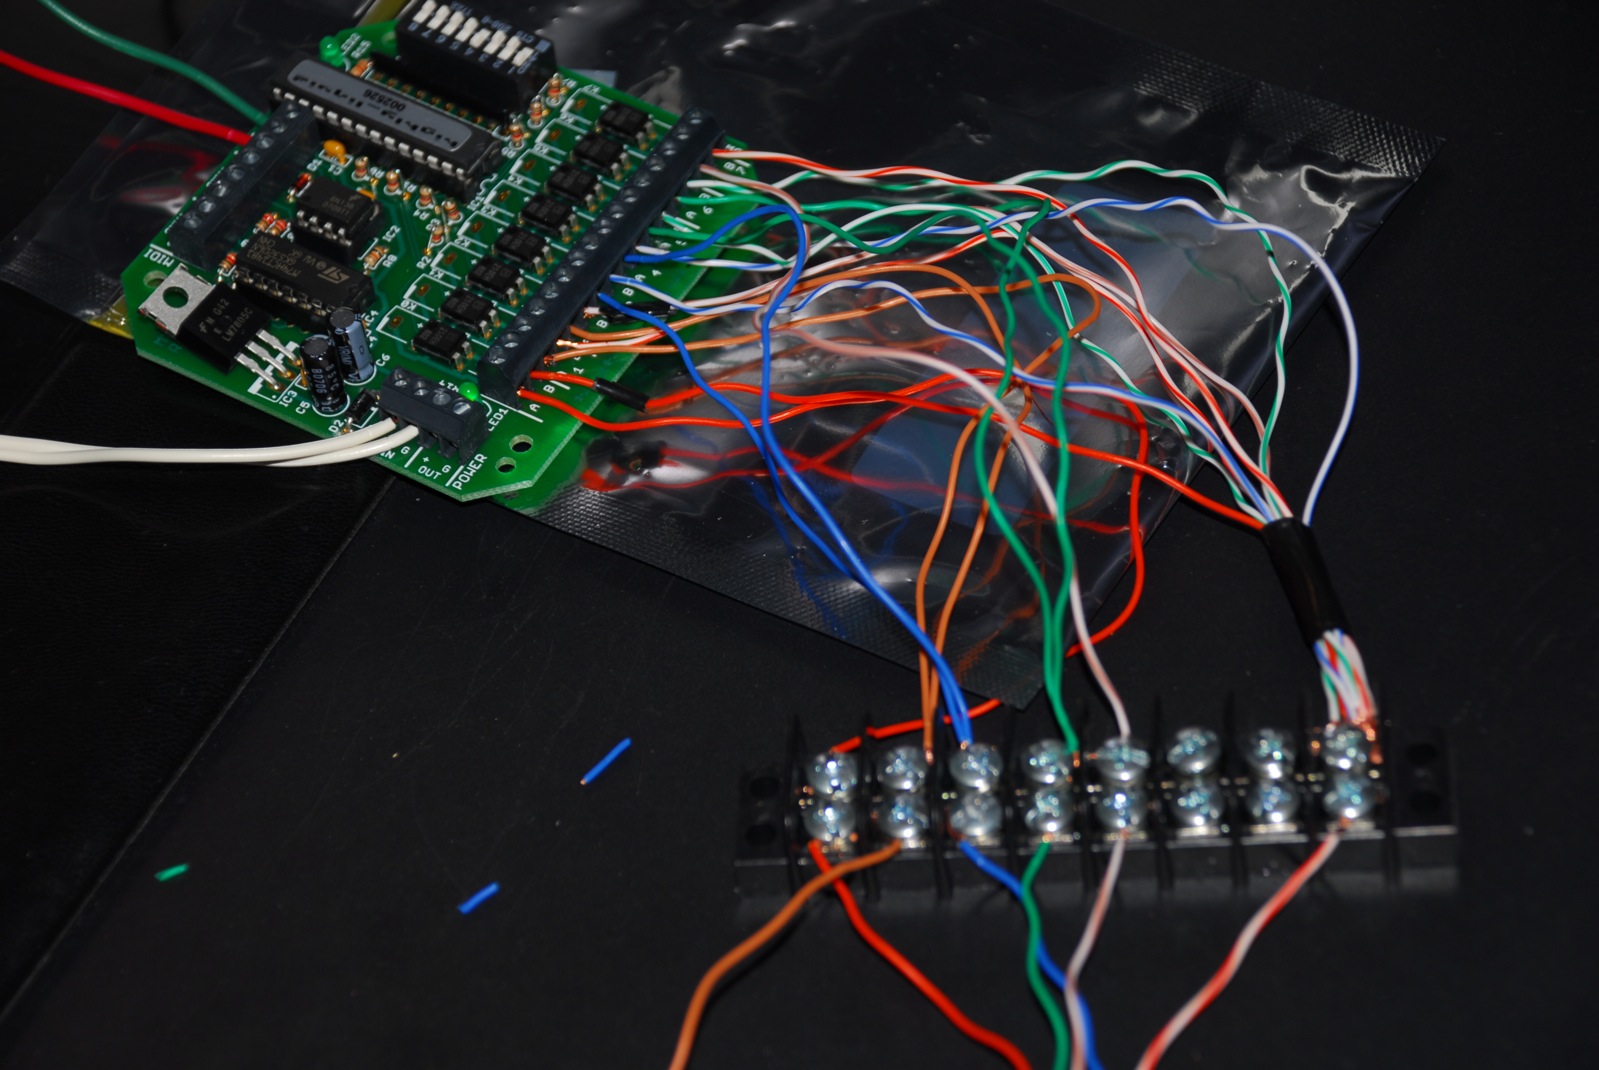
For splitting and to make all the wiring easier, I used an 8-position dual-row barrier strip from RadioShack.
I harvested more wiring from a Cat5 cable and I was pleased with the results.
Here is what it looked like, all wired up, after which I mounted it all in a project box:
So, to sum up, at this point, you have a Cat5 cable running from your Rock Band drum kit to the project box, where your MSA-P is stored (with power supply connected) and your MIDI jack mounted. Assuming you have correctly programmed your MSA-P and your DTXplorer is working properly, you should be ready to go.
Stage Four: Connecting the DTXplorer and PLAYING!
If you’re using a DTXplorer and the SysEx message I posted above, you shouldn’t have to do any additional configuration on the DTXplorer. This is because the MIDI notes sent by each trigger are pre-determined in the Yamaha brain and CANNOT be changed.
Therefore, you should be able to just connect your DTXplorer brain to the black box you just made via MIDI cable, and plug in to your XBox 360 and you’re done. Please note that the sensitivity of your DTXplorer pads is affected by the way you set up your DTXplorer, so consult the User’s Manual if you have any problems with sensitivity.
UPDATE: Personally, I had a problem with cross-talk, which would send extra notes (obviously a problem for playing Rock Band). I posted a quick guide for fixing that problem.
UPDATE: I’ve posted my first impressions of playing Rock Band with the DTXplorer.
UPDATE: I posted a very clear wiring diagram for the PS3 board that was created by rmurwin of the rockband.com forums.

March 17, 2008 at 9:44 pm |
Hey Flash, I have a question about the solder points. I checked my RB kit and it’s a green one like yours. I noticed that there are two holes circled for the green and blue buttons. Does that mean you should use either one of those, or both? Also, the holes themselves are kind of odd to me. Can you just stick the wire into the hole and solder it in place there, or do you need to remove the board from the kit and get at the other side? From the pictures, it looks like the wires are just soldered on the back. Sorry, I’m a newb with this and, like you said, do a ton of research before you melt anything. 😛
March 18, 2008 at 7:30 am |
Yes, both holes (vias) should work, but double-check the green one (I only see one circled). If in doubt, check out zolon’s picture above and use those vias.
As far as technique goes, I pulled the board out. Then I tinned the wires and threaded them through the vias (then kind of bent them to secure them). Then I just added a little solder (on the back/button side) to make the connection. On a few, I added some additional solder on the front side for a stronger bond. Other people have also added some hot glue for strength.
Yes, definitely do the research 🙂
March 18, 2008 at 8:57 am |
Sounds good, I can’t wait to try this out. I’ve ordered the MSA as well, but I have a couple questions about that. Did you use a specific piece of software to program the MSA using that MIDI to USB plug? Also, what power supply did you end up using with it? I have this 12V DC clunker with screw terminals that I used to use for some model railroading stuff. I think that would work, but it’s kind of big and inconvenient. 😛
March 18, 2008 at 10:36 am |
I used two programs with Mac OS X: HexEdit to write the message and SysEx Librarian to send it to the MSA-P. Both worked flawlessly.
I just used a generic Radio Shack 12V power supply I had lying around. Double-check the Highly Liquid site, but I think you can use anything 7-12V DC.
March 25, 2008 at 10:13 pm |
Okay, well I’ve gutted my RB kit and soldered the wires in place while keeping it all still working, so the hard part is done. 🙂 I’m waiting for my MSA and I’ve started on the box, and I’m picking up the same kit as you. Now I have a question about the kit itself. My brother is the real drummer in our house and he has a nice acoustic kit. I noticed when trying it out that the bass pedal tends to bounce off the head when the beater hits the drum. I’m worried that if this happens with the electronic kit, it ends up registering double hits on the kick. Did you have this problem at all? If so, can you fix it by adjusting the sensitivity in your other writeup about how to eliminate cross talk? Thanks a lot!
March 26, 2008 at 6:11 am |
Yeah, depending on the pad, the rebound can cause a double hit.
In the case of the Yamaha kit (with the KP65 pad), the adjustment you need make is not in the sensitivity of the pad, but the tension in your bass pedal.
Its really just a matter of trial-and-error. It didn’t take longer than 5 minutes for me to find a good setup and I haven’t changed it at all since then.
One suggestion I would make is to consider the beater you are using as well. For example, I have a Pearl pedal with a double-sided beater (one plastic, one felt). The felt side seemed to rebound less than the plastic.
Good luck!
March 26, 2008 at 10:19 am |
Ah I see. I’ll probably be using the pedal that comes with the kit, unless it’s terrible or something. It looks like it’s a regular felt beater from some pictures I’ve seen. Did you make the tension on the pedal tighter or looser? I would think looser would prevent it from being pulled back when you step on it. Also, have you noticed any wear and tear on the trigger pad? I’ve also read some suggestions to put a falam patch on it, as it’s prone to wear. Thanks so much again for all the help. You guys have been an unbelievable resource for this.
March 26, 2008 at 10:35 am |
Well I can’t remember whether I made it looser or tighter, but I personally prefer the beater to travel more. Like I said, I just had to try a few configurations to figure out what worked best.
I don’t notice any significant wear on the pad, either.
March 26, 2008 at 10:35 am |
Well I can’t remember whether I made it looser or tighter, but I personally prefer the beater to travel more. Like I said, I just had to try a few configurations to figure out what worked best.
I don’t notice any significant wear on the pad, but I would think a plastic beater would do more damage than the felt so if you go with one of those, you should probably use a patch.
April 11, 2008 at 11:23 pm |
Well tell me if i’m wrong but I want to use the wiring they ran to the normal rockband pads that are colored/white ground wires
Everything in my brain says its the same as soldering but wanted to ask befor i did anything
April 12, 2008 at 7:52 am |
Peekayboo,
Sorry, that will not work with the MSA method described here. I’ll try my best to explain, but forgive me if this doesn’t make sense:
The PADS on the RB kit use piezo-electric elements that change mechanical energy into electric energy. The piezos are little round discs about the size of a quarter. When you strike the pads (which contain the piezos), the piezo creates a small voltage. That voltage travels down the colored/white wires you mentioned. When the voltage reaches the controller circuit board, the board reads it as a hit on the pad and triggers the corresponding button/color.
By contrast, the actual BUTTONS on the RB controller work in a completely different way. They are just simple buttons that complete a circuit.
Now, the MSA-P that is used for this mod basically does what the BUTTONS do, not what the PADS/PIEZOS do. The MSA-P listens for MIDI notes and triggers simple switches in response to certain programmed notes. If you connect the piezo wires to the MSA-P, nothing will happen when the MSA-P triggers the simple switches.
So, thats the reason that we have to solder wires onto the lead and ground positions for the buttons–because our SOLUTION, the MSA-P, dictates it.
The only way that using the existing piezo wires would work is if you found a solution that translates MIDI notes into the same piezo-type voltage.
April 19, 2008 at 11:58 am |
I noticed this guide dosen’t mention anything about the ps3 version. Anyone know if the guide applies?
April 19, 2008 at 12:01 pm |
hardhat:
The mod does apply to the PS3 version and many rockband.com forum members are using it with PS3.
The only difference is that the PS3 control board on the drum kit is different, so the solder points will be different. Search the HOW-TO thread to find the pictures of the PS3 board.
April 23, 2008 at 2:40 pm |
[…] MIDI drum modification discussion at the Rock Band Forums continues, approaching 1,000 posts. The detailed how-to has also been updated. Below are some user-created MSA-P project enclosures for the […]
April 24, 2008 at 8:26 am |
Flash;
Per stumbling across this thread from ScoreHero and have since ben inspired to pursue my dream and learn the drums. I was on a pursuit for expert and getting frustrated at the kiddy drums in Rockband. So I have purchased and taken ownership of a DTXplorer and have all the necessary hardware on order of in hand. Questions are, on windows Vista or XP what program should I use to write the message to send to Sysex, or can you direct me to a location that explains this; And can’t I use your exact message you sent to the MSA P for mine?????
April 24, 2008 at 8:33 am |
AverageJoes Gym:
The Windows users on the rockband.com forum recommend Bome’s SendSX for creating and sending the SysEx message to the MSA-P. Here’s the link: http://www.bome.com/midi/sendsx/
And yes, if you are using an “out-of-the-box” DTXplorer, then my example SysEx message should work for you (as long as you wire your MSA-P the same way I did mine). Keep in mind though, if for some reason you want a different configuration (i.e. which drum triggers are assigned to which note/color/button), then you’ll have to make changes. Good luck with your mod!
April 25, 2008 at 10:21 am |
[…] added one of his awesomely clear photos of the PS3 board all soldered up to the How-To Guide but gclabbe’s post has a very good walk-through specifically geared toward PS3 users, so […]
April 27, 2008 at 2:34 pm |
Flash I followed your directions to the “T”, but when I plug the box into the DTXplorer I get nothing. The controler still works since I can manually operate it and all my wiring and soldering is correct. I have sent and re-sent the code using Bome and still get nothing at the drum pads. Is ther something I need to set my DTXplorer on or too?
April 27, 2008 at 3:05 pm |
AverageJoes Gym:
Do you get the 3 blinking confirmation lights on the MSA when you sent the SysEx message?
Also, did you set the dip switches on the MSA to channel 10 (the channel the DTXplorer uses)?
April 27, 2008 at 3:50 pm |
no when I type it in the left side and send it I get 1 blink on the USB/MIDI cable and nothing on the MSA. I get “sending MIDI out data” then sent 25 bytes, but nothing on the MSA blinks or registers.
1 and 4 are switched to on.
April 27, 2008 at 5:23 pm |
Ok, if you’re not getting the blinks on the MSA LED, then the SysEx is not getting to it. Make sure you have your power source connected and hot (going to the MSA). I am pretty sure than you get a steady LED on when the MSA is getting power.
Also, I’m not sure what kind of MIDI/USB cable you’re using, but mine has two MIDI connectors, one IN and one OUT. Honestly, I can’t remember which is the right one, but try both.
Beyond that, I can only suggest you check and double check ALL of your connections, including the power terminals and the connections for the MIDI jack. Otherwise, you may need to look into Bomes more and make sure you have it set up correctly.
April 27, 2008 at 5:41 pm |
checked all wires twice, have power on LED. Same cable as you and tried both MIDI connectors. I did have the MIDI wires on the wrong terminal blocks and switched it to the correct ones, and have downloaded everything I can from the Bomes site for up grades. I keep trying and reading the rockband post to see if I can get something, but no LED blinks. Very frustrated at this point. I appreciate you help and time, I’ll keep you posted.
April 28, 2008 at 1:55 pm |
Everything is correct, I have power coming in that registers on the MSA P terminal block from the MIDI connector, when I hold a multi meter to the blocks they register continuity when I send but no LED lights up?????
April 28, 2008 at 2:50 pm |
I’m not sure I understand what you mean about “power coming in that registers on the MSA P terminal block from the MIDI connector”.
Can you send a clear photo of your MSA to me? theflash0000@gmail.com
April 28, 2008 at 4:33 pm |
AverageJoes Gym:
Ok, I got your photos and the MSA looks good. Just to double-check, what kind of power source are you using (what voltage)? Also, do you get the steady LED on when you’re running power to the MSA?
April 28, 2008 at 4:36 pm |
You have mail, from verizon wireless and jguerra12@bellsouth.net. What I meant was, if I put a multi meter to the back side of the MIDI plug I get continuity and if I place it at the #4 & #5 screws I get continuity. Also if I hold the meter on the USB/MIDI plug it registers a spike, like it’s recieving info.
Still no LED lights up, in fact the only time the LED lit was upon initial hook up of the power supply, after disconnecting it to complete wiring it never came on again.
April 28, 2008 at 4:38 pm |
Ok, have you contacted HighlyLiquid? This seems like there’s something wrong with your MSA. They are very helpful.
Don’t worry–everyone that I know of that’s attempted this mod has eventually succeeded, even if they hit some speed bumps on the way. We’ll get it worked out.
April 28, 2008 at 4:39 pm |
The exact one you pictured in your photo from Radio shack. AC adapter 12v, 1.5 amps.
Yes constant light when plugged up at power LED.
April 28, 2008 at 4:40 pm |
Yes, twice with no reply yet. Patiently waiting. Hopefully I discribed the problem correctly.
April 28, 2008 at 4:42 pm |
Ok.
Have you ruled out the Bome Sysex software yet? Since I’m not familiar with it, I can’t be of much help.
I’d suggest registering at the rockband.com forums and posting in the HOW-TO thread. A lot of users have experience with it and can probably help you more than I can.
April 28, 2008 at 4:43 pm |
Will do, agian I can’t thank you enough.
April 28, 2008 at 4:53 pm |
AverageJoes Gym:
One more thing I noticed in the HOW-TO thread. Check out this post: http://www.rockband.com/forums/showpost.php?p=500766&postcount=907
One thing he did was temporarily switch the channel DIPs all back to off before you send the SysEx. Maybe try that?
I’m happy to help, but don’t thank me until you’re up and running 🙂
April 30, 2008 at 1:34 am |
I’ve just purchased a Simmons SD7K after having played RB for several months, so I’ve taken an intense interest in this topic. One thing I am wondering (and I am hoping this is not a stupid question): Why can’t a MIDI cable be connected from the DrumKit to a PC (MIDI–>USB), and then a USB cable from the PC to the PS3, and then some kind of software on the PS3 that takes the MIDI input to trigger PS3-Controller output through the outgoing USB to the PS3? It almost seems like this should be possible. I’ve successfully tried a mod where the PS3-RB-DrumController is plugged directly into a PC (USB), and special software “JoyToKey” takes that input to generate keystrokes (into music software that can take keyboard-input). So, it seems like it ought to be possible (through software running on the PC) to generate PS3-controller-output over the USB. If this is true, there’s no need for ANY soldering or any physical modifications… it could all be done through software on the PC. I hope this makes sense the way that I explained it, and I hope this wasn’t a stupid question. Tony TPalmeri@aol.com
April 30, 2008 at 1:37 am |
YIKES, I made a mistake in my last post. Here is the CORRECT version of the sentence:
Why can’t a MIDI cable be connected from the DrumKit to a PC (MIDI–>USB), and then a USB cable from the PC to the PS3, and then some kind of software on the **PC** that takes the MIDI input to trigger PS3-Controller output through the outgoing USB to the PS3?
April 30, 2008 at 6:33 am |
TPalmeri,
Unfortunately, your exact idea won’t work (I’ll explain below), but a slight alteration of it will.
Obviously you are correct that you can connect the SD7K or any other e-drum kit to your PC and set up software to trigger keystrokes, etc. The problem with going directly from the SD7K to the PC (via USB/MIDI cable) then from the PC to the PS3 (via USB) is that there is no known way to fool the PS3 into thinking that a genuine RockBand drumkit is connected to it, without a real RB drumkit controller board somewhere in the mix.
That being said, several modders over at the rockband.com forums have done something similar to what you describe, but it still requires modding/soldering the RB drumkit controller so that the PC is controlling something that the PS3 recognizes as a genuine RB drumkit. So it looks like this:
SD7K/E-Kit (via MIDI/USB cable) –> PC (via software triggering some game controller card connected to the wires soldered on) –> RB drum controller board (via original USB cable) –> PS3
Check out this post by SystematicGravy over at the HOW-TO thread where he describes how he did the PC mod:
http://www.rockband.com/forums/showpost.php?p=270211&postcount=188
April 30, 2008 at 10:30 pm |
Thank you for the explanation. I am curious as to the reason why the PC cannot “pretend” to be (emulate) the RB DrumKit. Is it some secretive protocol, or some hidden hard-coded device key, or some copyright infringement, or something like that? Or is it just that none of us know the trick? Thanks again for the quick answer to my last question 😉
May 1, 2008 at 6:16 am |
Its definitely hard-coded on the RB controller board and access to the technology requires a license from Microsoft for the 360 or Sony for the PS3.
May 1, 2008 at 9:06 pm |
hi theflash0000, awesome job with the instructions. i’m planning to do it with my ps3 using simmons sd7k drum kit. looking at the ps3 blue board soldering points pic, i’m little confuse where i should wire the red (snare), yellow (hi hat and hi tom), blue (mid tom and ride) and green (floor tom and crash). so any chance you could ask gclabbe to make a project overview picture like the one you did on the top but for the ps3 blue board?
May 2, 2008 at 7:24 am |
walbitoy:
Did you check out his post on the rockband.com forum HOW-TO thread? His pics there are pretty clear on where the actual soldering points are.
If you just want to know which is which, you can always just hook the controller up to a PC program for Xbox controllers and ground each one like I did.
I will post on the thread and ask for him to label them in his pics though. Good luck with your mod!
May 2, 2008 at 8:23 am |
Flash I am up and running and played for about 2 hours last night, man what a big differance. Now I have to get used to where everything is and when to hit what, I took your advice and have purchased an extra crash because as you said it gets too confussing on the brain.
The problem eded up being the IC1 board in the MSA P was blown and as soon as John @ highly Liquid hooked me up with a new one, all was well in my project world. Again thank you for all your help.
For anyone who reads down this far on this thread, Flash and John @ highly liquid are awesome, helpful people.
Let’s rock now, maybe I’ll see you on the Xbox Flash, again thanks.
May 2, 2008 at 10:54 am |
flash, thanks for the info. please let me know if gclabbe posted the pic with labels. thanks again.
May 5, 2008 at 1:51 pm |
hi flash, when purchasing the MSA-P decoder, do i need to the check the assembly service ($29.95) box? thanks!
May 5, 2008 at 2:23 pm |
walbitoy:
Yes, I would very highly recommend purchasing the assembly service. If you don’t, you’ll have to solder all of the components of the MSA-P together yourself. Basically, you’ll get back of electronic component trail-mix.
So spring for the assembly service and also the terminal block set (I think its around $8). With the terminal blocks, you won’t have to solder onto the MSA-P board, they have screw clamps.
May 26, 2008 at 1:02 pm |
Hey Flash,
do you happen to know if you can purchase the MSA-P in other countries (I live in Germany).
Or is it an exclusive board only manufactured by High Liquid?
May 26, 2008 at 6:01 pm |
Bandy,
There may be other devices similar to the MSA-P available in Germany, but the “MSA-P” device to which I refer in the guide is the one made and sold by Highly Liquid.
May 26, 2008 at 6:49 pm |
Yeah, the problem is that I don’t really know what the “MSA-P” is.
Just entering MSA-P lets me find completely nothing, only the one on the Highly Liquid site.
So got no chance finding another one if I don’t know what else can be used.
May 26, 2008 at 7:06 pm |
Well, any device that has MIDI input (i.e. listens for MIDI notes) and simple switches as output would work. You could start by looking for local solutions for triggering Christmas lights with MIDI music (this is a popular use of this sort of device here in the U.S.).
Unless there is some other reason you can’t use the MSA-P from Highly Liquid in Germany, I’d suggest you order one from them (FYI–I’m not affiliated with the company in any way). Good luck!
May 29, 2008 at 4:53 pm |
Hi!
Inspired by all the interest, I just finished creating a device that allows you to connect your electronic kit directly to the PlayStation 2/3 versions of Rock Band WITHOUT REQUIRING ANY SOLDERING. It’s a box with a USB output (connect to the game console) and a MIDI input (connect to your electronic kit. It has the same buttons as the regular Rock Band drum controller (allowing you to interact with the game and to customize the drum mappings as you want!). Please see my blog entry on rockband.com:
http://www.rockband.com/rockers_blog/sethmeisterg
–S
May 29, 2008 at 6:42 pm |
sethmeisterg:
You’re doing some awesome work man. I hope it works out with MS so you can make one of these for X360. Good luck!
May 29, 2008 at 7:19 pm |
Thanks, flash — I appreciate your support :). I sure would love to support the X360 also. If that situation changes, you’ll be the first to know :).
July 18, 2008 at 5:41 am |
hey Flash, thanks for posting your work and support. I have the same setup for my x360 and haven’t touched an rb kit since I broke mine 2 weeks in. Did you switch tom2 with tom3 in your sysex? Anyways, here’s my real question:
I understand the firmware on the 360 is a pain atm, but what do you think our chances are of using our existing setup with RB2?
-Thanks again homey!
July 18, 2008 at 10:11 am |
SpAiD, happy to help. I don’t believe I switched up the toms–on my kit they set up according to the RB chart (tom1-yellow, tom2-blue, tom3-green).
To answer your question: the chances of using this setup for RB2 are 100%. RB2 will be fully compatible with all RB1 instruments. You won’t have to do anything different (other than maybe recalibrate lag).
On top of that, it appears that you can use the RB1 drumkit (and therefore our setup) with Guitar Hero: World Tour. See: http://blog.wired.com/games/2008/07/xbox-rock-band.html
July 31, 2008 at 12:53 am |
Hi Flash, I have a alesis DM5 drum brain and wonder if it will work with this mod
July 31, 2008 at 5:05 am |
Chris-
If memory serves, several rockband.com forum members are using a DM5 with this mod. You might want to check out the HOWTO thread, but you shouldn’t have a problem as long as you know what MIDI notes you are working with. Good luck!
September 12, 2008 at 7:23 pm |
Hello
First off, I’m clueless when it comes to tech stuff like this, and i was wondering if any one knew of a place to buy the mod already?
I know it will probly be a bit more expensive, But like i said, I’d rather buy one that i knew worked, than to take my chances trying to build one myself
Thanks
Chris
September 12, 2008 at 7:28 pm |
Chris,
I don’t know of any pre-built mods for the Xbox 360, but if you’re on a PS2 or PS3, check out the HOW-TO thread for info on sethmeisterg’s which looks awesome and works right out of the box. Good luck!
Flash
September 19, 2008 at 5:03 pm |
Hey Flash, its really cool that our set is holding up so well with rb2. The low fill volume bug has made me switch things around a bit for audio. I now play with the instrument track down and use a custom kit from the drum brain as the primary drum sound source. The one thing I noticed is now I feel I have to step up a bit in timing. I didn’t realize the amount of tolerance rb gives you, even on expert.
I’m trying to find a way to hook up my laptop in between the drum module and our black box to remap the signals putting multiples onto the msa. Say for instance, the open hi-hat, closed both registering yellow. And a dual zone ride cymbal to register blue. I see our kits don’t allow for us to program the midi outputs so I’m looking for another solution. I can definitely see this helping play real drums getting all the real sounds and still playing rb as a guide. BTW, did you see anywhere on the web for us to upgrade the dtxplorer kit? Like mounting hardware, cymbals etc..? I read in the owners manual that we can hold a 3 zone snare and dual zone cymbals, but didn’t find any available..
September 22, 2008 at 4:01 pm |
SpAiD,
Sorry it took so long to reply…
I am also loving that the kit still works with RB2. On top of that, it looks like it will work with GH:WT, too.
I also agree about the low fill volume, but I guess thats going to be an issue with all RB1 kits being used for RB2. It would be nice if Hmx would patch that soon and give us a volume slider for that in the gameplay options.
Regarding your remapping idea, if you have a Mac, check out the program MIDIPipes. It would basically do exactly what you want. If you have a PC, I’m sure there is something that would work too.
My personal solution is a little more mechanical. I just bought some 1/4″ Mono splitters to plug into my DTXplorer brain. I added an extra crash/green cymbal, and another cymbal that I switch between blue to play open hi-hat notes and red to play 16-note hi-hat beats (a la Run to the Hills–then I use my yellow tom as the “snare”). My kit looks nothing like a DTXplorer anymore–I’m planning on posting some pics soon.
I got a cheap hi-hat stand and at some point I’m planning on putting together some kind of switch that will let me switch between closed/yellow and open/blue using the foot pedal. I’ve seen something that might work using a slide-potentiometer from a light switch.
As far as your own upgrading goes, the kit is compatible with virtually all e-drum triggers out there. Right now, I have a Hart Dynamics 13″ Mesh Acu-Snare, 2x Roland 8″ Mesh Toms, 1x Pintech 10″ Mesh Tom, a Roland 12″ CY-8 Cymbal for the hi-hat and two more CY-8s for crashes, and a 14″ Pintech Cymbal for the Ride. I also made a 10″ cymbal out of a practice cymbal and a piezo from Radio Shack. The rack is a standard 1-1/2″ tube, which is basically standard for e-kits. My next purchase will probably be a 14/15″ Roland Ride cymbal since the Pintech is kinda mushy.
Wow, that was long-winded. Long story short–the DTXplorer is more expandable that you might think, go for it.
September 27, 2008 at 9:29 pm |
There is a much simpler way to do all this. It does not require going through the whole MIDI method.
I have a cheap set of electronic drum set. Each trigger uses 1/4″ audio cables (patch cord) to go to the drum computer. I disassembled the Rock Band Drum Kit, removed the board from it, and attached female 1/4″ plugs into each color, red, yellow, blue, green, and brown (bass pedal). I put it all together in a small box, and everything worked perfectly. You can add two plugs onto the blue and green for the cymbals. Than you can just use the cables that came with your drum set and plug into the new box made.
The parts are all available at RadioShack and it cost me less than $30.
September 27, 2008 at 10:01 pm |
Taco Samurai,
Thats really cool that you have a cheap method like that working for you. Unfortunately, I happen to know that method does not work with all drum triggers.
Bandaddy on the rockband.com forums used this same method several months ago. He used Yamaha 8″ rubber triggers with unusable results. Those triggers are resistered down (I guess for velocity sensitivity). The result of directly patching them into the piezo lines on the RB kit was that the triggers required a very strong strike to measure a hit.
That said, you said you have a cheap e-drum kit. Cheaper kits seem to come with very simple piezo triggers, so I guess they lend themselves to the project you described. If you put together any sort of how-to, let me know and I’ll link it here.
Flash
October 2, 2008 at 2:13 pm |
Thanks to the help of the gang on the forums 6 months ago i modded a Yamaha DMXpress II and have upgraded some components since then. Then i had to learn how to play the drums which i have never done before Rock Band. This is my first video to show off my Rock Band only drum skills.
October 8, 2008 at 10:39 am |
Perhaps you can help me or point me in the right direction.
I recently bought a used DTXplorer module and the volume knob in nearly twisted off. I opened up and sure enough the knob is broken. My question is this, how can you fix something like this. Is there a way to replace just the knob with out tearing something up?
October 8, 2008 at 12:38 pm |
Jerry,
Sorry, that’s not something I have any experience with. You should check out dtxperience.com and the vdrum.com forums for help. Good luck.
Flash
October 16, 2008 at 9:49 pm |
Nice write-up. Thanks for the imfo.
November 30, 2008 at 12:42 am |
Hi, after reading this I have decided that I am going to do it but I have a few questions fist. I have a Simmons SD9K drumset it has 2 crashes and 4 tom and if I want to map 1 crash, the hi-hat, and the high tom to yellow and 2 toms and 1 crash to green what do I need to do? Also will I need to do anything different with my ride and lo tom that you did not have to do?
Thanks,
Blake
December 1, 2008 at 1:55 pm |
hey flash just a quick question. would all this work with the new rb2 wireless stuff. like the solder points. i current;y have this mod workin with my rb1 360 stuff. i recently bought rb2 for my ps3 so i can play with my buddies. i haven’t opened my kit up yet, but there shouldn’t be a huge difference between the buttons.
thanks for anyhelp
Callum
December 1, 2008 at 2:08 pm |
Blake: you’ve got two options–you can either write your Sysex message to map each MIDI note to red, yellow, blue, green, or kick (see above section on Sysex messages) or, if your MIDI unit allows, you can reassign MIDI numbers to each trigger to get the desired result. Not sure off the top of my head whether that Simmons unit allows MIDI notes to be reassigned.
LowCal07: unfortunately, I don’t know whether the solder points, etc., in this guide are applicable to the RB2 kit. One thing to note is that I don’t think that any of the velocity-sensitive features will work with this mod as-is. Please let me know if you do open up the RB2 kit and/or would be willing to provide a wiring diagram to supplement the guide.
December 1, 2008 at 7:36 pm |
Alright thanks, I’ll figure out my best option but I was looking through this guide: http://www.rkuo.com/blogs/rkuo_blog/pages/Using-an-electronic-drum-set-with-Rock-Band.aspx and in the section about programing the MSA-P he has his MIDI numbers listed and then he shows what they are in hex which are the numbers he uses in the Sysex message so do you have to convert the numbers to hex and if so how do you convert them?
December 2, 2008 at 8:06 am |
Blake: here is a web-based hex converter tool: http://www.statman.info/conversions/hexadecimal.html
I did a quick search, but could not come up with the owner’s manual for the Simmons SD9K, which is where all your MIDI notes will be listed. If you want to go the most direct route, you can just convert your MIDI notes into hex, then copy my Sysex above and insert the correct MIDI notes in hex form.
Let me know if you need additional help. Good luck!
December 4, 2008 at 1:42 am |
ugh. so close its not even funny. i have my message thing set to the same message as yours, and works great with my rockband 360 kit. I got the rb2 kit wired and the snare, hit hat/tom1, ride/tom2, crash/tom 3 work great. now i know the ps3 bass needs it’s own ground and found it , but when i hook it all up i get nothing from the pedal, or if i hook the two grounds to one i get a message saying all the usb are used up please disconnect one. i was reading on the forum that one guy was havin issues and found that his message was runnin 40ms, and the ps3 kit needs 100ms. i’m not too sure how to do the message thing and all i try doinin is bump up the kick trugger setting and see if that works for me.
again thank you for your time
December 5, 2008 at 10:25 am |
Good news.
The Guitar Hero World Tour drums are a PLUG & PLAY SOLUTION for MIDI drums with a brain capable of assigning MIDI notes.
You can even turn the drums into a new rack mounted box in 20 minutes.
Check it out: http://docsrockbandmods.netforums.us/step-by-step-ghwt-drums-to-rack-mount-midi-box-for-e-drums-vt22.html
December 5, 2008 at 11:16 am |
Doc:
Cool link. I didn’t know that removing the controller box from the GH:WT kit was so easy.
As you said though, that solution will only with with a MIDI brain capable of assigning MIDI notes, which the DTXplorer and several other popular budget brains are not.
December 5, 2008 at 11:48 am |
Bummer, I followed a manual link and got DTXpress MIDI info instead of XPLORER.
Time to upgrade those brains.
A working Hi Hat is great:
That vid was actually through an R8 but it works just as god with theGHWT box.
Stop by the forum from time to time. There is always good for more drummers. 🙂
December 5, 2008 at 11:48 am |
I mean good of course. God has nothingto do with it. 🙂
December 5, 2008 at 1:16 pm |
Doc:
Yeah, I am extremely jealous of the working hi-hat. Simply no room on the MSA-P to make that work. Guess I will finally have to start looking at some Roland brains…
Great to see a dedicated RB modders forum up too. I’ll be there 🙂
December 15, 2008 at 10:09 am |
Your particpation would be greatly appreciated.
I would love to build you a DTXplorer section and let you go nuts posting all this great work.
PM me from my form when you get a chance and I will set it up if you are interested.
Cheers!
January 3, 2009 at 4:02 am |
Hi, i had successfully done it with my GHWT drum kit thru midi. and set the midi notes for ghwt.
1 question:it works fine for ghwt game but about RB2 which only requires 4 colour bar, the green pad and cymbals are combined? i had tried setting my dm5 crash cymbals midi note to 45 and changed the voice to crash but there are dual voiced output.. the crash + the tom note:45.. common problem? So i guess i cant use the crash cymbals for rb2? OR will your adapter fix this?
not perfect
January 3, 2009 at 10:01 am |
zo,
You should create separate custom kits on your DM5 for GHWT and RB2. Proceed trigger by trigger and assign the appropriate MIDI note for the “color” you want that trigger to activate.
Most RB users map their e-drum kits this way:
Snare:Red
Hi-Hat Closed:Yellow
Hi-Hat Open:Blue
Tom1:Yellow
Tom2:Blue
Tom3:Green
Ride:Blue
Crash:Green
Kick:Kick
On the RB custom kit, you won’t map any triggers to the Orange/Crash note found on the GHWT kit.
That configuration will give you the closest mapping from RB note chart to musically correct drumming.
January 3, 2009 at 11:00 am |
hi flash, i got what your meant. however, id set the green trigger to note 45 as a tom3 and inorder for rb to read my crash , i need to set it as green too and change the voice to crash instead of tom. the presets had note 45 as a tom voice by default. so when i hit the crash n my tom 3 now i get 2 sounds. the crash and the tom. is there anyway i can set individual voice for each trigger for dm5. i think other kits had no problem except dm5and some yamaha kits..
It is not really abt the mapping.. its abt setting the dm5 trigger. to the midi note that the rb2 can recognise and only my midi channel 10 can be read,..
hmm anyone using dm5 can enlighten me on this?
thanks
January 3, 2009 at 11:50 am |
in another words, the dm5 allows 2 triggers voices to be played when u hit on 1 trigger..
this is sickening. anyone figure this one out yet?
January 3, 2009 at 11:53 am |
zo,
I see what you’re saying now. I wasn’t aware that was even possible. Are you sure you aren’t just getting really bad cross-talk between Tom3 and the Crash?
May 1, 2009 at 12:44 pm |
I’d love to use my Yamaha DTXplorer with Rock Band. Why isn’t there some sort of adapter on the market already? The technical details of building this are beyond be but to someone who knows the ins and outs of this stuff it should be quite simple. I think I’m going to try and contact Yamaha.
May 16, 2009 at 3:03 am |
I followed this and built a unit about 9 months ago, and love it. I was wondering if anyone has played around with the trigger time to see what the minimum is for the 360 kit to register a hit; was 40 ms a time established by testing? I find that when I drum really fast, though I can hear seperate notes coming from the drum brain via headphones, some of them get missed by the xbox, and I was wondering if lowering the note length would fix it.
May 16, 2009 at 8:18 am |
Alec,
The suggestion to use a 40 ms note length is the result of a fair amount of testing. If you check out the thread on the rockband.com forums, there are a number of users who prefer a note length of 25 ms or even lower. When I tested my rig at 25 ms, I experienced major problems with dropped notes.
Not really sure of the science behind it, but I think the concensus is that it has something to do with the built-in “buffer” that the game affords the player (i.e. the player can “hit” the note several ms early or late and it still registers as a clean hit).
Hope that makes sense. Remember, there’s no harm in trying different note length settings to get your kit dialed in. Good luck and let us know how it goes.
Flash
May 16, 2009 at 6:43 pm |
Thanks for the info. I played around with different settings, and found that I can go as low as 10 ms and not experience dropped notes. I can get notes to register much closer together, resulting in much faster rolls. At first I got some extra notes, but I fixed that by adjusting the drum brain itself (x-talk and sensitivity).
Alec
May 20, 2009 at 4:47 pm |
Interesting page. will definitely visit soon
June 22, 2009 at 4:01 am |
Thanks for this. Got my gear up (Roland TD) and it works like a charm!
August 5, 2009 at 12:14 pm |
If anyone is interested, you can use the circuit (middle image) I have posted here if you prefer to use the existing Rock Band 1 transducer inputs of the drum controller. I created a RB interface using a Basic Stamp that involved connecting each Roland drum pad directly to the stamp, but the MIDI is much more elegant.
http://picasaweb.google.com/jeidson/RockbandDrumBasicStampInterface#5366527756702300690
September 30, 2009 at 4:40 pm |
Is it possible to get th Yamaha Dtxplorer working on a Wii for Rock Band 2, How do I go about it?
November 8, 2009 at 1:53 am |
I feel this is a good article and may all be interested to read this article .. you are best friends
http://electricguitar-lessons.com/yamaha-bass-guitar
December 4, 2009 at 2:33 pm |
Ok, so I have a sound card with MIDI IN and OUT in it, and I need to have my DTXplorer go out to the IN in the sound card, then come out of the Sound card in different MIDI drum mapping so i can connect it to my GHWT kit and play… Is this possible at all?
December 4, 2009 at 2:39 pm |
Stefan Harp,
Sounds like you’ve got all the hardware you need. Now you need the right software. I’m on a Mac and I have some freeware called “MidiPipe” that allows for the necessary mapping. I don’t know what the equivalent would be on a PC though. Good luck
Flash
January 24, 2010 at 4:35 am |
Checked your blog posyt several times before going ahead and getting the DTXplorer. I connected it to the games using the eDrum Wireless Controller (Xbox 360) and a mac book running Midi Pipes.
Full tutorial: http://www.samanthahalfon.net/worldgoneweb/2010/yamaha-dtxplorer-kit-with-rock-band-or-guitar-hero-on-xbox-360/
July 4, 2010 at 4:46 pm |
We article looking on to these records. in order to put for you to favorites, I will read a lot from several of your additional content at the same time. Thank you!
July 6, 2010 at 3:07 am |
Hi Flash, I have a Roland TD-12 and I was wondering how to chart closed and open Hi-Hat separately. I have already charted everything else to my liking, it’s just the Hi-Hat that is puzzling me. But I would like to know if there is alternative midi notes for cymbals and drums for fills, for example I hit the yellow cymbal in a fill and it makes a hi hat sound, but when I hit the tom it also makes a hi hat sound. Is there any way to fix that?
July 6, 2010 at 7:16 am |
Psyquar–unfortunately, there is no way (that I know of) to accomplish this with the MSA-P mod. It looks like some of the MIDI-capable equipment coming out for Rock Band 3 will probably allow for this (and also full use of the Pro Mode), but otherwise I don’t know of a good solution. Good luck and let me know if you find anything.